Mahogany back & sides set
Cedar soundboard
spruce braces
small mandolin/banjo fretwire
generic geared tuners
Mahogany fretboard & scroll (Hardwood Lumber Co.)
ILS MDP-010 plans
All glue is either Titebond or DAP/Weldwood yellow carpenterĺs glue unless otherwise noted.
Top/Back/Sides were supplied about 1/4" thick, varying. Sides thicknessed with block plane (some tearout; probably not sharp enough), router with MDF jig (inconsistent and very messy) and sandpaper. Top & Back using sharp plane only; worked better. Some tearout with plane due to alternating grain. Top very nice, but may be a bit thick. Side thickness averaged about 13/128ö thick when I got done with them.
Backs jointed with router using tru-line guide clamped to workbench. Not quite straight, but possibly because I didn't take off enough wood. (Bit not in contact with wood for full distance.)
Iĺve since used sandpaper attached to a level and a plane. They all work about equally well.
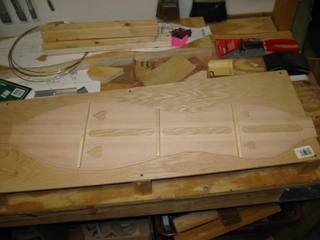
Soundboard thicknessed with block plane, properly sharpened this time. Works a lot better. Hereĺs a thickness map, done with a vernier caliper. The measurements are about 3ö apart. Numbers are 128ths of an inch.
| 16 | 15 | 14 | 13 | 15 |
| 18 | 15 | |||
| 19 | 15 | |||
| 17 | 16 | |||
| 17 | 17 | |||
| 16 | 16 | |||
| 16 | 18 | |||
| 16 | 16 | |||
| 16 | 17 | |||
| 15 | 18 | |||
| 14 | 18 | |||
| 13 | 15 | 15 | 15 | 20 |
Back thicknessed with block plane, better than sides but some tearout due to alternating grain direction. Only planed inside; outside was sanded only. (Well, okay, I planed it a little. And got tearout. Donĺt do that again.)
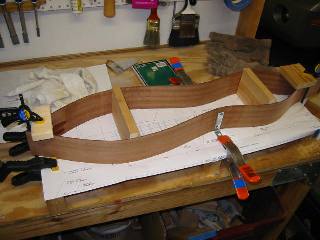
Sides bent on homemade hot pipe consisting of an electric charcoal starter and 600W dimmer switch. Some light scorching but it sands out easily. Clamped to ad hoc building board (1/4" oak plywood with 2-1/2" feet). Blocks to hold ends in place, scrap wood spreaders for upper & lower bouts, angle bracket clamped to board for waist. Not happy with it. Copy of plan taped to board as a template.
Rough outline of plates cut on scroll saw. Mark the _inside_ of the back and soundboard because that's what you line up the sides with.
Soundholes cut on scroll saw using #2 blade on slow speed. Do NOT try to use XActo; cedar is too grainy and you can't cut it straight. Plan pilot holes carefully because the soundboard won't rotate 360 degrees on the saw. (Itĺs too long.) Cleaned up a bit with small file. Not perfect.
The end block is a bit over 3/4" thick per plan, but I made mine 2 x 2 x 3/4 thick because that's what I had. Cut angled sides on scroll saw (angled the table.)
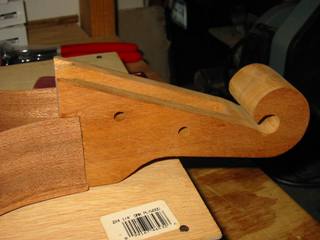
I cut the scroll out of 2 pcs of 3/4" Mahogany, with 1/8" Mahogany (left over from back/sides) laminated in between. The center was hollowed out mostly with the router before laminating. The outline was cut with the scroll saw. I later drilled a hole for the Ĺhookĺ on the scroll. Glued it up and sanded.
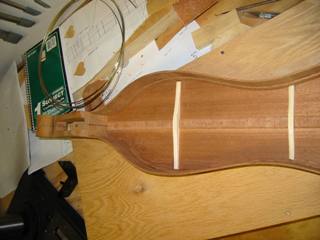
A back seam strip of cross-grain Mahogany was glued to the back and rounded off with chisel & sandpaper. Tis could have been done after the back bracing; itĺs personal preference.
I had to rebend upper bouts and clamp them in a mold (inner + outer, made of plywood.) Worked much better than clamping to worktable.
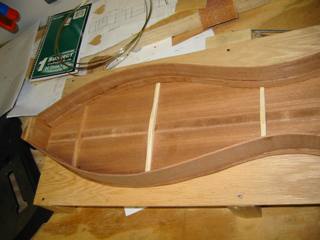
Top & back braces were cut from 1/4 x 3/8 spruce. Glued to back and shaped with chisel. (The plan has a typo for brace location measurements, but I doubt itĺs critical.) Lower back brace is mahogany because I ran out of spruce.
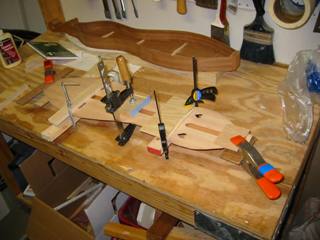
Glued sides to back using a plywood board and paint cans for clamps. Works lousy. Spool clamps are the correct way to do this, I think. Also should match side heights before gluing - preferably before bending. (Consider gluing backs to sides before cutting back outline. Be sure to leave plenty of overhang for trimming if you do this.)
Glue in the tail block and scroll at the same time as the sides. Tail block grain should probably be horizontal, not vertical like I did it. Sand height to match sides + back + soundboard.
The fretboard was sized & flattened with a block plane and sanding. I recalculate the fret positions using 12th root of 2 method, and got very slightly different numbers than the plan. I located the fret slots with a steel measuring tape - clamp the tape to end of board and measure at end of tape where it's got smaller divisions. (Iĺve since gotten a steel rule with 1/64ö divisions.)
Mark the slot location with an Xacto (or other razor knife), scribe across with a razor knife and square. Cut with XActo razor saw guided with combo square. (the slots were a bit narrow for the fretwire I had.)
Cut strum hollow with a router. Hollow out the bottom of the fretboard if youĺre going to do that (I did this on the router table and a straight bit) and shape the tail end of the fretboard.
Cut position dots holes using a 1/4" Forstner bit. I had to enlarge the holes slightly with a Dremel in a router base. (Note: do not move Dremel height once it's adjusted, because you'll never get the same setting back.) I glued the inlay dots in with epoxy; CA works well also.
Sand top of fretboard only to 220 grit.
Fretting: I have better luck pressing frets in with some glue rather than hammering them in. (several went in poorly.) Remove ALL glue squeeze-out, because it won't take finish there. Trim with end nippers, then file. Sand fretboard sides.
Cut lining (leftover mahogany) on scroll saw. Went pretty quick. 1/16" thick, about 3/8" tall. Donĺt ask why I didnĺt do this before gluing the back to the sides. Should have glued lining to the sides, then sanded edges smooth, then glued the back. Guess I glued the linings in at this point; I donĺt remember.
Glue braces to top.
Fit the top to box and mark where braces & lining needs to be cut. (brace ends pass through lining and touch sides.) Trim brace ends and taper (chisel and sandpaper) to the desired shape.
Cut notches in lining for braces. This was easiest with a Dremel tool, followed by clean up with a razor knife.
Drill #61 holes in end of fretboard for string pins (brass #18 x 3/4" escutcheon pins.)
Drop fill fret end gaps in sides of fretboard using glue and sawdust. Sand smooth.
Mark centerlines on body, fretboard, and top for gluing.
I had to trim the scrollhead due to string interference. (Also, the tuner holes were not big enough for the bushings, but I didn't know that. The original intent was to use Grover Sta-Tite friction tuners, but I couldnĺt get them into the holes with the scrollhead I made.)
Glued the fretboard to the top using 2 pins for registration. RH was 64%, which is too wet, but I brought everything indoors for the glue to dry. Parts were generally stored indoors when not being worked on.
The scroll/headblock should extend under the soundboard and fretboard for support. Mine didn't, so I glued in a little shelf to hold the top up.
Glued the box closed, with a little label inside. 55% RH. Label was just printed on an inkjet and stuck in with Titebond.

For edge trimming, I used a chisel to get close, then the Dremel with a coarse sanding drum. Made a mess. Tried a drill press sanding drum which was not concentric, gave poor results. Ended up using 60 grit on a sanding block.
Major gaps filled with Elmers professional wood filler (heresy!) Really only where the tail block meets one side, and where one side meets the scrollhead.
Sanded everything through the grits - 60, 100, 150, 220, 320, 400. Blew off dust with compressed air.
I tested some finish options ľ straight Tru-Oil, Tru-Oil over Shellac, and Tru-Oil over Shellac with a Tru-Oil wet-sand pore fill. (Later I tried Tru-oil over an Elmers pore fill over shellac.) I really couldnĺt tell much difference between them. I used the Tru-Oil wet-sand version.
I masked the fretboard with blue low-stick masking tape and wiped on 2 coats of 1# cut shellac. (Zinsser in a can; nothing fancy.) Use a small brush for corners. Let dry overnight.
Very light dry sanding with 600 grit. Remove tape. (Sort of pointless to have it on, really. I ended up finishing the fretboard anyway.)
I used Tru-Oil - wipe it on, wipe it off immediately. Let dry overnight, then smooth very lightly with steel (plastic) wool. 3 coats.
Lightly wet-sanded 2000 grit using Tru-Oil as lubricant to fill pores. Back, sides, scroll only. This should have been done more, or with coarser grit, or something. Didnĺt get a good pore fill.
Cut nut & saddle blanks from Purpleheart, 1/4" x 3/8" each.
I polished a small area of the scroll with 3M Fine Cut Rubbing Compound. This was a bad idea ľ it dries white in the pores, which didnĺt really fill. I removed it with water and applied another coat of Tru-Oil overall.
Let everything dry 1-2 days, then very light dry sanding with Micro-Mesh 6000, 8000, 12000 grits on a felt block. (Only about 3 strokes on each grit.) Polished with Formby's Lemon Oil Treatment (I used too much, but came out okay.)
Nut and saddle were sanded to fit slots (not glued in.) String pins inserted and string slots cut with an Xacto and triangular needle file in both the nut and saddle. (I eventually had to deepen a couple of the slots because strings kept popping out. Itĺs a design flaw; thereĺs too much angle on the strings.)
Strung it up with GHS 012/012/012/022w. Initially I looped both treble strings on the same pin, but the pin pulled up. I replaced that pin, and drove all pins in further, with only one string per pin.
Had a buzz on the bass string at the 3rd fret. A scrap of sandpaper put under the saddle fixed it. Later had to lower one fret just a bit.
Last updated 02 Feb 2005